Advertisement
Here’s How to Plan A Family Picnic Under $20!
Blog | September 22nd, 2021

Have you ever asked the question “where do you want to go eat?“ and nothing special comes to mind? Favorite places have been visited too frequently making them less exciting. Others sound delicious but are way too expensive. Maybe you simply aren’t comfortable with going inside food establishments quite yet. Food allergies make it hard to relax when your server isn’t sure what is in your order. But hey! No worries! There is an answer that’s fun, perfect for any occasion, inexpensive, and totally customizable to your needs and likes! It’s called a picnic! Let’s dig into some great food and ideas to make yours the perfect outdoor cuisine for under $20!
Set the Atmosphere
Everyone has an old bedspread or blanket. That’s a great start for comfortable seating or laid-back cloud watching. Get your table/ground setting from the Dollar Tree. You’ll find paper plates and napkins of almost any color. Add fancy plastic cups to enjoy without the worry of breakage. Pick up a bouquet of faux flowers for your centerpiece. If you’re using a table, add a plastic tablecloth to keep things clean for you and the next diners. You’ll have a setting for up to eight people at a grand total of four-five dollars with no dishwashing needed!
Make the Menu
This can vary depending on what sort of picnic you’re throwing. Is it a full family get-together? A date night? A kid-friendly outing? A camping adventure? Here are some inexpensive options to have you prepared for any picnic occasion!
Family
Families get together for reunions or simply the fun of food and fellowship. The more families involved, the bigger the spread with minimal cost per family. Have each group or adult contribute their specialty. If single uncle Tim is not a great cook, he can bring drinks or chips. Grandpa Joe can whip up his famous chili recipe and Aunt Sue can bring on the desserts! Dividing the duties will make a picnic to remember while costing each person or family considerably less than $20!
Date Night
If a girl’s heart doesn’t race over a guy that puts together a romantic dining experience under the sun or stars, she is not the one! Come on guys, now’s your chance! Pack that picnic basket with sparkling water, plastic wine glasses, cheeses, grapes, and a bucket of chicken! (yes, chicken! Girls really do get hungry whether they admit it or not! She’ll thank you later!) Don’t forget the two, and only two, individual chocolates for the accent that will melt her heart! All this can be yours for a mere $20!
All About the Kids
Children may be picky but they really are easy to please. All you have to do is think like a kid! Bring the portable grill, charcoal, a pack of hotdogs, buns, ketchup plus a few bags of chips and Cheetos. Just before loading the cooler, grind up some fresh ice and pack it into a small Styrofoam cooler. Inside the cooler with drinks, pack those plastic tubes of unfrozen Popsicles. Scoop the crushed ice into a Styrofoam cup, pour the chilled liquid Popsicles over the ice to make a surprisingly cool snow cone dessert! And there you have a fabulously kid-pleasing menu for approximately $20…or less!
So, here are your ideas. Now it’s time for some picnicking recipes that meet the $20 price goal!
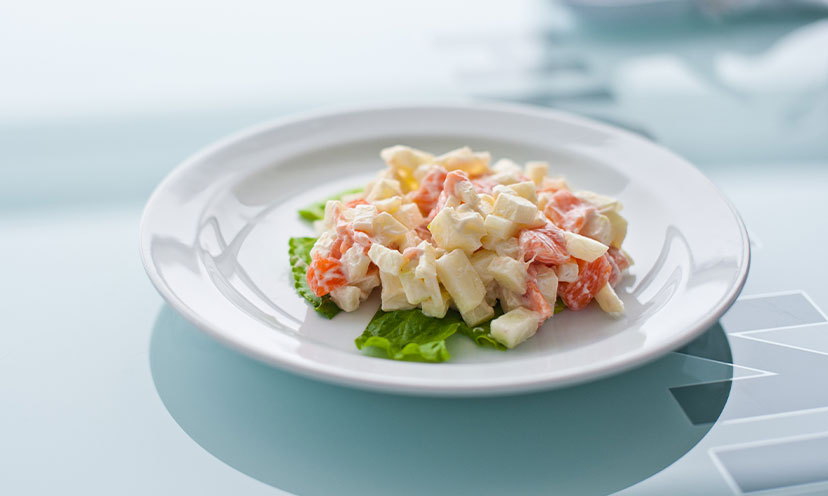
Crab Salad
Ingredients
- One package of imitation crab
- One 12-16 ounce box of shell-shaped pasta, cooked and drained
- One cup finely diced celery
- 1/4 cup finely chopped onion
- 2 cups mayonnaise (adjust for your desired creamy consistency)
- Salt and black pepper to taste
Directions
- Cook noodles according to package directions making sure they are tender but firm.
- Cool noodles in colander under cold water.
- Shred the crab and add to noodles
- Fold in remaining ingredients until thoroughly mixed.
- Refrigerate overnight.
- For the picnic, store in an airtight container on ice in a cooler.
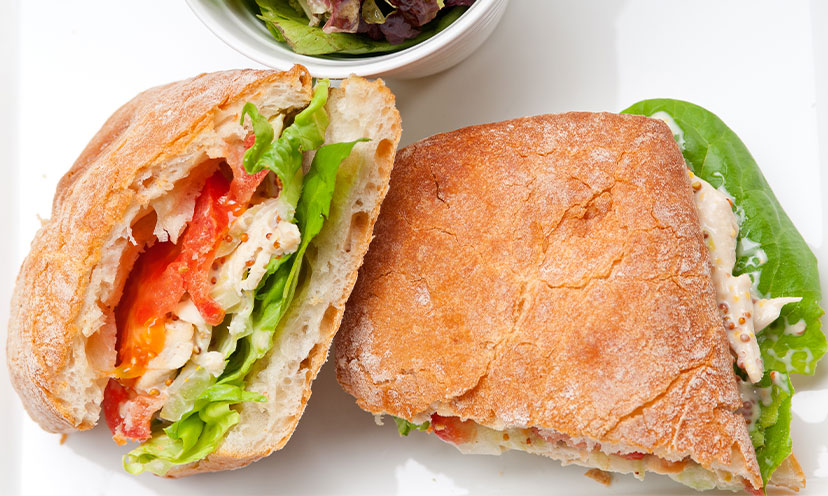
Chicken Caesar Salad Sandwiches
Ingredients
- 3 cups shredded rotisserie chicken (1 chicken)
- 1 garlic clove, minced
- 1 tablespoon fresh lemon juice
- 1 tablespoon red wine vinegar
- 1 teaspoon Dijon mustard
- 1/2 teaspoon Worcestershire sauce
- 1/4 teaspoon salt
- 1/8 teaspoon black pepper
- 1/3 cup extra-virgin olive oil
- 1/3 cup Parmesan cheese, grated
- 3 tablespoons mayonnaise
- 1/4 teaspoon garlic powder
- 4 mini baguettes or 1 loaf of French bread cut into four portions, split
- 4 romaine lettuce leaves
Directions
- Place chicken in a medium bowl.Blend garlic, lemon juice, red wine vinegar, mustard, Worcestershire sauce, salt and pepper in a blender until smooth.
- Gradually add olive oil, and process until smooth.
- Stir in Parmesan cheese.
- Pour dressing over chicken and toss until well coated.
- In a separate bowl, stir together mayonnaise and garlic powder.
- Cover the insides of bread with mayonnaise mixture.
- Divide chicken mixture and lettuce leaves evenly among bottom bread and cover with bread tops.
- Serve with chips
*Optional: Heat a large skillet over medium heat. Cook bread, cut side down in hot skillet until toasted and golden brown. Wrap in foil until ready to serve.

Walking Gyros
Ingredients
- 12 one-ounce bags of pita chips, crushed
- 1 pound lean ground beef, cooked (or lamb…a more expensive option)
- Greek seasoning of your choice
- 4 ounces crumbled feta cheese
- 1 cup tzatziki sauce
- 2 cups lettuce, shredded
- 2 medium tomatoes, diced small
- 1 small cucumber, peeled and diced
- 4 ounces Kalamata olives, sliced
- 1 cup hummus, plain
Directions
- Cook your ground beef (or lamb) with the Greek seasoning.
- Keep meat warm. (for a picnic, a thermos works great)
- Prepare all toppings and put in sealed containers.
- To serve the gyros, start with the pita chips. Open the bag and gently crush chips into small pieces.Add your favorite toppings to the bag of chips, stir and enjoy!
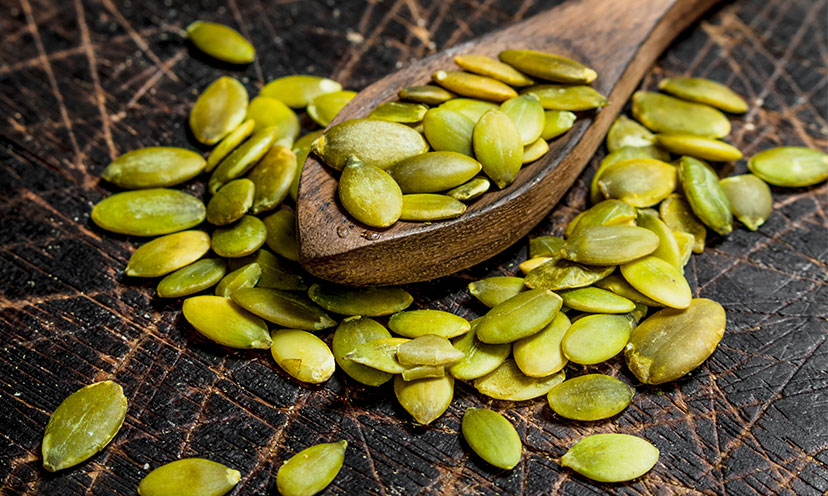
Toasted Pumpkin Seeds
Adding a seasonal touch is always a plus! For fall, here’s a snack that will add healthy festivity to your outing!
Ingredients
- 2 cups raw, whole pumpkin seeds
- 1 Tablespoon unsalted butter, melted
- Salt
Directions
- Preheat oven to 300 degrees.
- Rinse seeds to remove as much of the pumpkin as possible.
- Spread seeds on paper towels to remove water.
- Line a cookie sheet with aluminum foil.
- Spread the pumpkin seeds out and drizzle with butter.
- Mix seeds well.
- Sprinkle with salt and mix again.
- Bake for 40-55 minutes until the seeds are lightly browned.
- Stir every 5-10 minutes after 30 minutes for even browning.
- Cool and enjoy!
- Store leftovers (if there are any!) in an airtight container.
Get out of the house, grab a breath of fresh air and enjoy mealtime in a different way while saving a basket full of cash!
Add a jug of cold iced tea, sparkling water with frozen berries, or bottles of ice-cold water to stay hydrated.
Related: 13 Nearly No-Spend Outdoor Activities To Enjoy This Spring
Get It Free Recommends